
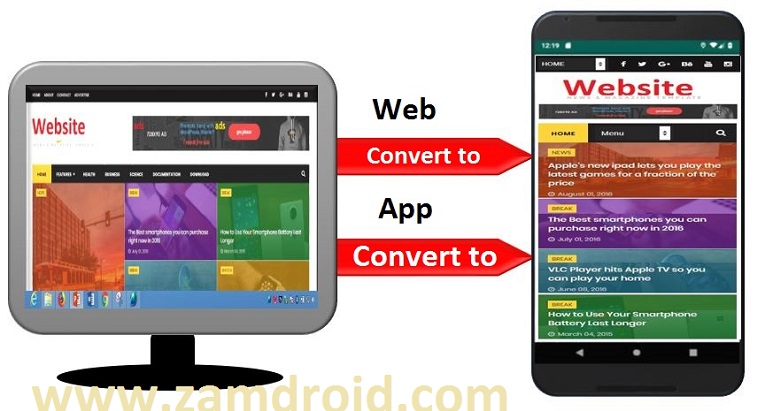
How to convert a website to Android application. Apk
convert WordPress to Android apk
convert any domain name to Android app
convert blog spot to Android app
Convert blogger domain to Android app
Convert YouTube channel to Android apk.
These days the number of Android phones is almost higher than the number of humans on earth. And more is being design and produced every day. As a blogger designer or app producer, YouTuber it will be amazing to have you blog websites or YouTube or forum in Android app.
This will not only make it to reach more people but to show people how serious you are.
In this website (zamdroid) I have written an article on how to connect your website to Android app.
There was a hitch on that article because not only that the API used is (API 23) which Google doesn’t accept again in play store developer but also there are some features that have been updated here. In order to understand this post details you should read this unless you are familiar on converting android to app. You can still use that if you want circulate your android app but not on google playstore.
This conversion of website to Android app us API 28 which is the latest android 9.0 Pie at the time of writing this post.
Do you have some coding skill or know how to copy and paste codes? You do not read much coding still to do this work but before we start conversation of this website to app, let’s tell you the requirements.
1. Download Android studio here
2. You need a computer of this capacity
3. You need internet with good speed at least 3G to 5G.
4. You have to design a transparent logo.
5. Design images with different sizes for Splash Screen(optional).
Bonus : Add a messaging services that will notify those that installed your app that you have a new post or article or video. This will notify them of your updates.
Note: In case you don’t have time to convert your website to app we can help you for fee of $10-$15. You can contact us using comment section or our email.
Learn How to make Glo Network open your blogspot
Remember before you will load your app on Google play store you have to pay one-time $25. You can post as many as you like with on account. If you don’t have money to pay. For now you can still distribute your app through other free hosting site.
Before we start How to convert your website to Android application using Android studio lets show you the amazing feature the application will give you.
The new features that added here are.
a). The progress bar that progresses across bar to show that your app is loading online.

b). A reminder message if internet is not connected on the user phone. This reminds your user that he needs check his internet connections or settings, since your app uses internet.

Learn How to write complete blog post 100% SEO friendly
c). A Waring message that tells the user that further press of android back-button will exit the application.

d). Update of news from your website or YouTube.
e). Swipe up down to refresh. This shows that when you slide down the current page you are viewing it will refresh the entire page with circular rotating bar.

Convert Your website to android application apk.
Step 1 Design of android icon and splash image
Design your logo if you have it already held straight to luniapic website to make it transparent and reduce the size. Ensure you use a picture editor to make the logo image bright, sharp and small in size.
I recommend (256×256)px or (512×512)px png picture format.
Android will still scale it further.
Note: You can use same image for logo and splash screen depending on your choice. If you want more professional work, you can have separate image for splash screen. We are not going in details about splash screen here. We are not going in details about splash screen because we only want single splash backgroud while your Android user await your website to open.
Step 2 Preparation of images
Prepare splash image you can automate the size to suit all screen (LCD) sizes or use (720×1020) ping. Write up supposed to be at middle of image and the colour background should match the colour in (colour.xml) code interface.
Keep the logo and splash image to be used later.
Step 3 Choosing android phones that will run android app.
Download Android studio install the software and open it.
Download Latest Android Studio Here
Watch How to convert a website to an Android application in 2019 video here.
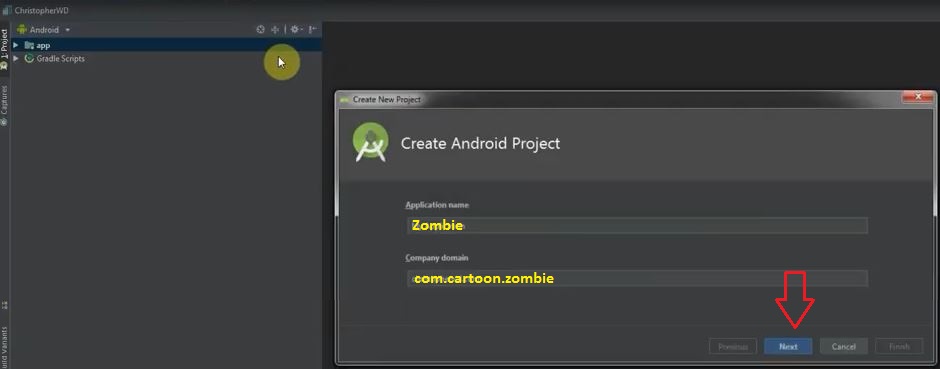
Create a web view container by select empty activity and your app name eg zamdtek choose company domain here, it is important to add different thing to com.domain.com
App name is (zambie) then com.cartoon.zombie Cartoon zombie.
Select the minimum SDK, I always choose Android 4.0.3 so that wide range android phones can use my application. Android version 4.0.3 to android 9.0 Pie can install and use the android.
We start our codes coding and editing.
You can download the complete code for web to app here
a) Go to res>>> layout >>> activity-main xml Change to text change to text and add this codes.you will get complete codes at the end of the post. Always note the caption/ tittle carefully.
Note
Always Chang com.Domain.com to e.g. com.Cartoon.zombie. that your own app name
Step 4 Adding color, style and No Action bar on android app
Change the colour of the app background.
Go to res >>>value >>>strings.xml
Go to res >>>value >>>style.xml
Go to res >>>value >>>colour.xml
At this stage we remove action bar on top of the app by going to
Res >>>value >>>colour.xml change
Res >>>DarkActionBar to NoActionBar
Change our app icon/logo from default to customize
Go to res >>>right click >>>image asset then background layer >>>colour >>> choose your desire icon logo or enter the HTML code. Let’s say E31B13. Back to foreground layer >>>image >>>path. Locate the image you save in step 2 (logo icon)

Still In the same place use rise to change the colour the colour scheme to your desire and save.
Step 5 Activating internet on android application
let’s connect our Android app to internet we add this code to AndroidManifest.xml.

<uses-permission android:name=”android.permission.INTERNET” />
<uses-permission android:name=”android.permission.ACCESS_NETWORK_STATE”/>
We go ahead to check on network state (pic to connect website) we held to MainActivity and add this code always remember to check and change your com.domian.name and http//google.com to your url address.
Sync the gradle
Step 6 Set Back Button and Swipe to Refresh
Set back button and Swipe to Refresh:
To add back button, we add in MainActivity.java these codes or just copy and paste everything.
under this
As the use continue pressing back button, the application will go back to already viewed until the back button warn user of closing the app entirely. (You about to close the app).
Swipe to refresh (when you slide down the page of website it will refresh).
Go Res >>>layout >>>activity_main.xml and add below code under
android:id=”@+id/main_container”
tools:context=”.MainActivity”>
App >>>java >>>MainActivity.java we add a line under private webview webview ( ) add the entire code see picture Swipe up down to refresh above.
MainActivity.jave will look like this
Step 7: Create Horizontal Bar is optional
Let create horizontal progress.
a). Go to res >>>activity_main.xml and add under
</android.support.v4.widget.SwipeRefreshLayout> below code in box
You can also change the Progress Bar colour according to your choice.
b). Go to app >>>java >>>MainActivity.java add under private webview webview ‘ private progress bar progress bar’.
Better add the entire code.
Get codes here
You can request for complete code using comment section.
How to convert a website to an Android app Part 1 and How to convert a website to an Android app Part 2
Continue on part 2 to add Splash Screen and Activate Push Notifications
Go ahead
hello
best post android learning. thank you.
i want download the code of this project.
From my end it works well
Check your your code and all commenting.
I have converted many website to android app with this code.
Cross check your work or send us message for help
Thanks
Its not working getting error..
error: class MyFirebaseMessagingService is public, should be declared in a file named MyFirebaseMessagingService.java
error: no suitable constructor found for Intent(MyFirebaseMessagingService,Class)
constructor Intent.Intent(String,Uri) is not applicable
(argument mismatch; MyFirebaseMessagingService cannot be converted to String)
constructor Intent.Intent(Context,Class) is not applicable
(argument mismatch; MyFirebaseMessagingService cannot be converted to Context)
error: incompatible types: MyFirebaseMessagingService cannot be converted to Context
error: incompatible types: MyFirebaseMessagingService cannot be converted to Context
error: cannot find symbol method getSystemService(String)